Posts

Showing posts from March, 2010

Arrivederci!

Image
We’re leaving for Tuscany tomorrow. I can’t wait! I plan to return with molto artistic inspiration. Stay tuned!

Score, trim, and fold your own cards

Image
I usually prefer to outsource my card production to my local printer. It saves so much time to pay someone else to print, score, and fold. When I have a small print run, however, it’s usually more cost effective to produce the cards myself. I printed these bridal shower invitations on cardstock paper with my Epson inkjet. To prepare my InDesign file for printing, I included crop marks and a bleed. A bleed simply means that the image “bleeds” off the edge of the page. In order to make that happen, you have to extend the image area past the crop marks.   On the flip side of the card (the inside) I included marks for scoring the paper to fold the card in half. The first thing you want to do is score the inside of your card. Always score the inside so the cut is hidden from view. Align your ruler with the score marks. Run the back of your Exacto blade down the length of the ruler, applying a small amount of pressure. Even though you are using the back of the blade, you can still acci

Favorite Book Cover of the Week - Slow: Life in a Tuscan Town

Image
Last week I neglected to post about my favorite book cover of the week. One of my faithful readers called me out on it (how flattering!) and so here is my delayed post. The book is Slow: Life in a Tuscan Town . Created by my favorite small publishing house, Welcome Books, this is the perfect cover for me to post this week. We're leaving for Tuscany on Thursday and I am so excited to slow . . . things . . . down. This morning I also want to say "happy spring!" and share a photo of the exciting signs of the season in our yard. This forsythia has grown from cuttings of Ran's great-grandmother's forsythia bush in North Carolina.

New cards in my shop - lots of 'em!

Image
I've had a very productive week in my studio and have 3 new cards to sell in my shop. The first is a print of my butterfly woodcut design, carved and stamped by me. I love the hand-crafted look and feel (literally, the ink is raised) of this card. The second is a new "fill-in-the-blank" thank you card. It's called "Fairytale Thank You Card" because of my little fairy drawings that light up the scene. The third is my absolute favorite. I came up with this image last week during the long stretch of rainy days. What started off as a rough pencil sketch became an adorable painting (if I do say so myself) of a little girl and her umbrella. Ran actually came up with the line "missing you." I love this illustration but it makes me feel a little sad. I think it's the perfect note to send to a distant friend or loved one. Thanks to Fireball Printing , I was able to design these on Sunday and have them in my shop by Thursday. Click here to go t

Happy Saint Patty's Day!

One of my favorite songs and the perfect day for it!

Creating mono-prints with a hot plate and crayons

Image
Today’s tutorial is great for kids. It’s also a fun project for adults who want spend an hour or two with their inner-child. My mom is a preschool teacher who has introduced me to some fun, easy, and unique projects like this one: creating mono-prints with a hot plate and crayons. Since I don’t own a hot plate, I had to make do with my stovetop griddle. A hot plate is safer to work with so I recommend using that if you’re doing this with little ones.  You will need: Crayons Heavy craft paper (standard printer paper will not work as it absorbs the wax from the crayons) Hot plate Tin foil Spoon Cover your hot plate securely with tin foil. Heat to a medium temperature so that you can melt the crayons. Draw your image on the heated foil using as many different crayons as you want. Keep in mind that thick lines will become large blobs when the wax and paper smoosh together. It took me a few tries to get these bunnies to stay in the shapes of bunnies. Place the paper on top of the melt

Let the sun shine in

Image
According to accuweather, the sun will return to Philadelphia tomorrow. The weekend was not a total bummer though. On Saturday I whipped out my paint brushes and spent some creative time in my studio. On Sunday Ran and I enjoyed a quality morning at the Picasso exhibit at the Art Museum. This little illustration is one of the results from my artistic efforts on Saturday. I used gouache on watercolor paper. It's called "missing you."

Make your own outdoor ice sculptures

Image
Although spring has almost sprung, I can't resist sharing these pictures of pretty ice sculptures that my sister made for her yard. My mom is the creative mind behind this fun and easy project. Scroll down for instructions on how to make your own ice art . . . and save the idea for next winter! Instructions: Freeze containers of colored water (mix food coloring and water) or a combo of colored water and organic materials such as berries, twigs, birdseed, etc. in your freezer overnight (until frozen solid). Play around with different container shapes - like a narrow plastic cup or a flat casserole dish. To loosen them from the mold, run a little hot water on the outside of the container. To stack them, mix snow and water until you have a thick slush. Use the slush to "cement" the pieces of ice together! They look beautiful in the sunlight!

Always (Font-tastic)

Image
My monthly email update from myfonts.com has introduced another lovely script to my library. Below is an excerpt from the source. There is a style of handwriting fonts that we at MyFonts have dubbed “creative common” — inventive variations on what may initially seem to be ordinary handwriting, but is rather fancier when you take a close look. Check out bestsellers like Satisfaction and Nothing, and you’ll know what we mean. The successful new script Always from Anton Scholtz is a family in the same vein but is a somewhat more ornate variation on the informal script theme. With its four weights, from Light to Fat, it offers four distinct flavors, giving you plenty of variety for all possible uses — from packaging and book covers to greeting cards and advertising. All weights come with a set of automatic ligatures for a more natural, handwritten effect.

Free web background resources and working with patterns in Photoshop

Image
I'm designing a blog for a local writer and one of her criteria is an Indian-style pattern element. I went on a google search for free web backgrounds and came across The Ultimate List Sources for Free Background Patterns at instantshift.com . I ended up choosing a site called bgpatterns.com  to create my pattern. I like this site because you can adjust the pattern icon, size, color, texture and opacity in their user-friendly pattern generator. I've included some screen captures from my process here: 1. Select your pattern icon. 2. Select the color. 3. Adjust the texture and/or opacity. 4. Download your pattern. Creating the pattern in Photoshop 1. Open your pattern download in Photoshop. Click Edit > Define Pattern. Name it whatever you want. Close the file. 2. Click File > New to create the canvas for your background pattern. Make it big - like 1400 pixels by 1400 pixels. 3. Click Edit > Fill and then "pattern" from the drop down menu. Selec

Upcoming Spring Craft Fairs in Philly and Brooklyn

Spring is almost here and craft makers and craft buyers are gearing up for craft fair season! Check out the list below and mark your calendars.  All of these fairs are still in need of vendors. UPCOMING SPRING CRAFT FAIRS:  April 17th, 11-6pm Philadelphia Designers Market, First Baptist Church of Philadelphia, 123 South 17th St, Philadelphia; Set up as a fashion retail/shopping experience the Market allows designers to directly interact with their customers at low cost, little hassle and high exposure. This format provides designers an environment in which they can foster relationships between themselves, other businesses and consumers. Cost is $100 for the day. Register at their website. http://www.philadelphiadesignersmarket.com --------------------------------------------------------------------- April 24th 11-6pm Fishtown Shadfest, Penn Treaty Park in Historic Fishtown, Philadelphia; Artists & crafters interested in vending may contact Minna Aaparyti: MKABooks@msn.c

Pretty Puerto Vallarta

Image
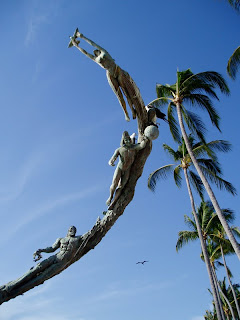
Now that it is starting to get light out a little longer, my winter blues are fading away. Until the temperature gets above 60 though, I still like to daydream about tropical places. Today's post brings me back to the warm beaches of Puerto Vallarta. I'll use my talented husband's description of the scene since he (always) describes it best. He also took these beautiful photographs. This is an excerpt from his travel article on DivineCaroline.com : The statues spaced evenly along the promenade were a revelation: gods and goddesses swirling in a maelstrom towards the palms, twisting in the midst of physical transformation, looking down upon their thrones, and ordering their monks to build them a ladder to the heavens. The synthesis of these sights and sounds created the atmosphere you crave when traveling southward. If you want history and refinement, if you want the waltz, go to Europe. But if you want creativity and vitality, the samba, the salsa, or the tango, go to a pl

New cards in my shop: The Easter Egg Painters

Image
The Easter Egg Painters are hard at work! This card is colorful and unique and perfect to send to your loved ones on Easter. Click RIGHT HERE to order and see more photos.

DIY gift tags

Image
I needed to figure out a quick but crafty way to thank my wonderful customers for their orders. Using scrap paper, my letter stamp set, an ink pad, scissors, and hole puncher, I created my new "thank you gift tags" to attach to my orders. I also made a couple "to/from" tags for any gift wrap orders. It's so easy - you don't even need any instruction. Just remember to put the stamp letters backwards on the stamper!

PBR Craft Challenge and the Mini-Plushies Hand-stitching Tutorial

Image
The Philadelphia Independent Craft Market's 2nd Annual PBR Craft Challenge took place this past Saturday at the lovely and lofty 2424 Studios in Fishtown. The creative energy electrified the room as crafters displayed their PBR-themed artistry to the echoing beat of the live music. Tee shirts, knitted toys in the shape of a beer can (a starter tool for babies, they say), prints, cuff links – you name it, a PBR theme applied. My favorite table (of course) was the Handmade Philly table where our very own Ruth Schanbacher held a tutorial on hand-stitching with felt. Click RIGHT HERE to visit the Handmade Philly blog for photos and instructions on creating your very own mini-plushie.