Posts

Showing posts from September, 2010

Off with her head! Henry VIII as a book cover designer

Image
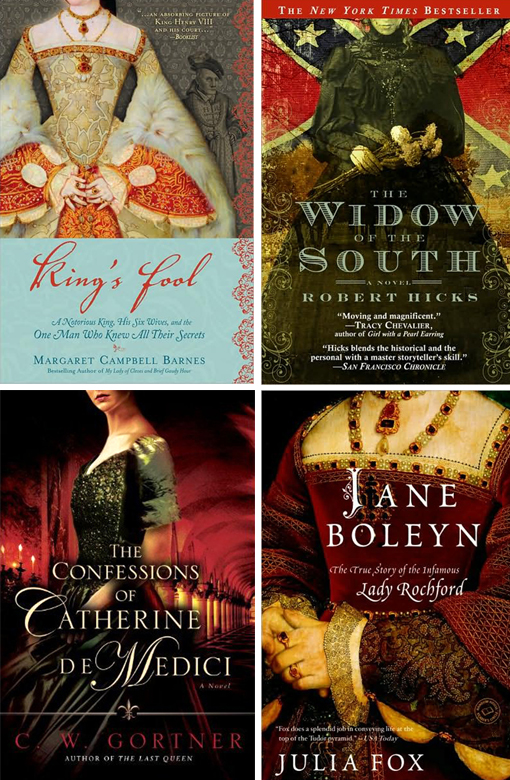
Loved this clever article from  Print Magazine - What would Henry VIII do? Graphic Designer Mirko Ilic let's us in on his theory about the "Henry VIII" book cover trend. I love that he included Jane Boleyn: The True Story of the Infamous Lady Rochford . I designed the interior layouts of this book for Random House. My boss knew about my interest (obsession) with Tudor England so I got first dibs on the manuscript. A real treat for me!

MacArthur "genius award" for a master type designer

Matthew Carter , designer of over 60 font families including nearly ALL of my system fonts (Helvetica, Georgia, Snell Roundhand, Big Caslon, etc), has been awarded a MacArthur fellowship . Over the next 5 years the MacArthur fellows will receive a stipend of $500,000. I'd say that's a well deserved prize for all that this letter crafter has done for our letterforms! Read more at the NPR.org blog. A little background about The MacArthur Foundation : MacArthur is one of the nation’s largest independent foundations. Through the support it provides, the Foundation fosters the development of knowledge, nurtures individual creativity, strengthens institutions, helps improve public policy, and provides information to the public, primarily through support for public interest media.

Stamping with corks - continued!

Image
After I made my candy corn cards , I flipped my corks over and carved two more shapes—a crescent moon and a starburst. This time I used a standard ink pad for the color instead of acrylic paint. I love the way these look! In case you missed Monday's post, check out my simple instructions here .

DIY "Candy Corn" Stamps and Cards

Image
Here's a fun and easy Halloween card that you can make with very few materials. You will need: Two wine corks Orange and yellow acrylic paint (you can also use a regular ink pad) Hobby knife Blank white paper (card stock is best) 1. Use your hobby knife to carve the top and bottom orange stripes of the candy corn shape. Start on the top of the cork and cut about 1/8" to 1/4" deep. Then cut in from the sides to remove the unwanted cork sections. Go slowly as the cork cuts very easily. 2. Out of the second cork, carve middle yellow stripe of the candy corn shape. (See my photos for reference.) 3. Dip your 2-stripe cork into the orange paint. With some pressure, stamp it onto your card. 4. Dip your 1-stripe cork into the yellow paint. Aim for the middle of the two orange stripes and stamp. 5. Make a fun pattern with candy corns! They look almost good enough to eat. *Note: you should do a few test stamps on a piece of scrap paper before you stamp your cards. Be

Philly Swap 2010 and a craft for your weekend!

Image
Philly Swap 2010 is fast approaching! If you live in the Philadelphia area, you should totally come. It's an afternoon filled with unlimited clothing swaps, silk-screening workshops, craft demonstrations, live music, art exhibitions, and more. The date is Sunday, October 3rd and it will run from noon to 5pm in the beautiful Urban Outfitters HQ space at the Navy Yard. General admission tickets are $20 but if you enter the promo code: FBSWAP at http://phillyswap.ticketleap.com/2010 you'll get $3 off! I'll be one of the craft demonstrators and my workshop will be all about stenciling and stamping with household materials. Next week I will be practicing for the big event and sharing my results on The Lettered Set. Stay tuned to learn how to stamp and make cards with all sorts of things that you already have in the house! Today's craft is the main feature so I thought I would treat it as a "craft for your weekend" in case you have time to try it too. I'm ma

Philadelphia Artist Spotlight: Robert Morgan

Image
Gang o' bots 03 © Robert Morgan I am really enjoying Philadelphia artist Robert Morgan's "Robotic Art." I love the expressions and body language of these metal creatures. He has captured wonderful human emotions with his illustration techniques. Check out his site, therobotsweatshop.com , for purchasing information and to view his full portfolio. On a side note, my husband discovered Robert's work via business card in a Northern Liberties coffee shop (market yourself people, it works). Burner © Robert Morgan

North Carolina Wedding Weekend

Image
I'm still feeling the glow from the beautiful wedding we attended near Chapel Hill, North Carolina over the weekend. The wedding took place outside on the sprawling, green grounds of Fearrington Village and the reception was held inside the gorgeous barn, all aglow with little while lights. As a designer I am always looking for inspiration in the wedding "day of" embellishments—from flowers and place cards to napkin rings and favors. Each table location card was tied to a lovely little bouquet of lavender and all of the place cards had a colored ribbon that corresponded with the meal of choice. I love the color combinations with different purples and green and white accents. The groom's mom, Betsy, made sure every piece was tied together perfectly - literally! She lovingly hand-tied all of these little pieces herself. I took a close-up picture of one of the tricks she used to secure the ribbon to the place cards. Note how she made two slits to loop the ribbon through

Butterfly woodblock cards - my printing process

Image
I love the look of block-printed cards. While fulfilling a recent order for my butterfly cards , I took some pictures of my printing process. Supplies: carved block, block printing ink, newspaper to protect your work surface, blank cards, brayer (roller), inking plate (I use a small cut of plexi). Step 1. Ink the plate. Squeeze about a tablespoon of ink onto your inking plate. Roll the brayer over the ink until the ink is coating the roller. Reapply ink to your plate every two cards. Step 2. Apply the ink onto your carved block. Roll the brayer across your carved block. Apply light pressure as you roll. The goal is to get the ink to stick to the block, not smear it around with a heavier force. Step 3. Stamp the card. It helps to have a couple more sheets of newspaper underneath the card as a cushion. The block will make a more consistent imprint on the card. Step 4. Leave your cards to dry for 48 hours before stacking them or packing them up for mailing.

DIY: Sew a simple fabric book cover

Image
Photo from Craftzine.com Okay so I may be a little late with this one as many students have already covered their text books for the season. But it's never too late to spruce up what ya got! Here is a really easy sewing tutorial from one of my favorite resource blogs, Craftzine . This is such a fun way to show your style and personality in class! The materials are listed below and the link to the tutorial is here . Materials Sewing machine Book, hardcover or paperback 1/2 yard fabric Rotary cutter and mat, or scissors Thread Pins Needle

Wednesday Workshop: Watercolor portrait of baby Charlie

Image
I just finished this watercolor portrait of a cute baby named Charlie. My friends commissioned me to do this as a gift for Charlie's parents. My technique for portraits is to create a pencil sketch and transfer it onto watercolor paper using my tracing paper technique . After the sketch has been transferred, I go in with my pencils and eraser to add and remove lines as needed for a delicate mark-making balance. Once the pencil drawing is done, I add light washes of watercolors. The finishing touch is black ink to highlight some of the important portrait lines. Below is the original photo of Charlie that I used as a reference.

Autumn Gifts at Etsy

Image
The handmade artists on Etsy.com never cease to amaze me with their creativity. Here are some of my favorite Autumn Etsy finds: Apple Rubber Stamp by Norajane Handmade Autumn Gift Tags by Green Earth Goodies Ozymandius the Owl T-Shirt  by Wren Willow Falling Leaves Tea Towel by madder root Autumn Branch Printed on Old Dictionary Page by Jean Cody of Fauxkiss Autumn Leaf Candy Dish by Miss Pottery

Creative use of space in an urban backyard

Image
Our new deck Last week my father-in-law and his friend built a deck for us in our backyard. I had (boring) visions of a basic, flat deck covering the dirt wasteland that was home to old wood and leaf piles. Little did I know that a treehouse would evolve over the course of four days as Larry and Joe worked their magic. They had a simple plan to begin with too but it was modified as extra wood pieces and tricky corners became tables, benches, railings, and tree framing countertops. It's as if a whole new room has been added to our house! I love our new space so much that you'll probably find me out there with my coffee and paper even in the dead of winter. "Before,""after," and "during" photos are below. The "before" photo is a shot from last summer - it shows the yard with one extra tree and without the wooden privacy fence that was installed in July. The backyard before - Summer 2009 After - September 2010 I call our deck &qu

DIY Jack-o-lantern sponge stamps and Halloween note cards

Image
I can't believe it's time to think about Halloween. In honor of a new season, I decided to try something new and make a video tutorial for this Halloween-themed DIY project. Sometimes it's easier to watch the steps rather then look at the photographs. This project is great because you probably already have a lot of the supplies in your house. Feel free to be creative and make other sponge shapes too - flower petals, hearts, balloons - there are so many possibilities. I plan to do more video tutorials - it was really fun! I'd like to thank the academy and my husband for his wonderful camera work. Supplies Glue gun + glue Exacto knife orange water-based paint (acrylic paint or opaque watercolor/guache) blank note cards a new (dry) kitchen sponge paper plate (to hold the paint) scraps of hard plastic packaging material (like the kind that cell phones and scissors are sold in) scissors black pen paper towels newspaper to protect your work surface small con

Susan Jeffers, children's book illustrator

Image
all images from susanjeffers-art.com When I was a kid and people asked me what I wanted to be when I grew up, I always answered "children's book illustrator." My inspiration came from my all time favorite illustrator, Susan Jeffers . As I perused her site recently, I was taken back to age 6 when I would sit for hours flipping through the pages of Haiwatha , Stopping by Woods on a Snowy Evening , Cinderella , and The Snow Queen . Her drawings truly come to life on paper. Jeffers' writes about her technique on her site: waterproof black ink with opaque watercolor. I'm working on an illustration of the Beowulf story for Ran (one of the stories he will be teaching this year) and Susan Jeffers' work is definitely going to be a guide for me. Who is your favorite children's book illustrator? all images from susanjeffers-art.com